Find My iPad | The Only Article You Need If Your Device Is Lost Or Stolen
Enabling and setting up the Find My iPad feature is a must for all iPad owners. As the name suggests, this service gives you options to manage your missing device.
You can track your device's movements and locate its whereabouts. You can also alert the finder to contact you and even remotely wipe your data from your device, so it doesn't fall into the wrong hands.
How you do this is described in details throughout the contents of this article.
There are other pages on my site that are related to the iPad, including the iPad Revolution, which describes the rise to prominence of the word most popular tablet device, and the iPad Manual, which is a detailed user guide to help you get the most out of your device.
Join The Human Byte — Get The Ultimate BIOS Update Guide
- Receive the Ultimate BIOS Update Pack
- Includes a set of checklists, flowcharts, and your Beep Code Finder support your BIOS update process
- Also includes a full set of eBooks including a Survival Guide and step-by-step Support Guide
- Receive regular emails with practical information you can use
- I only use your e-mail for the newsletter. Unsubscribe anytime.

Why Enable The Find My iPad Service?
The service is now called Find My, and is adapted to work with iPads and other Apple devices.
By their very nature, the convenience of mobile devices means they come with us on a lot of our journeys.
Mobile devices are carried in handbags, suitcases, rucksacks, and briefcases. They travel with us on trains, cars, taxi's and aeroplanes. They get used in café's, hotel rooms, libraries, and parks.
When you start to think about the above scenarios and more, there is a real risk of your iPad being stolen, misplaced, dropped or simply lost somehow.
This is the last thing you want to happen to your expensive device, even if it is innocently misplaced, you can guarantee your device won't be lost for too long!
Fortunately, the Find My iPad app allows you to:-
- Identify the location of your iPad on a map (subject to internet access). You can check this at any time;
- Track your missing device's movement during the previous 24 hours;
- Display a 'lost' message on your device and sound an alert to help you or a passerby to find it;
- Remotely lock your device if it does not have a passcode to prevent unauthorized access;
- Remotely wipe your device, so your personal data does not fall into the wrong hands.
To do all the above, you need:-
- Internet connectivity through a Wi-Fi connection or your 4G or 5G provider
- A free iCloud account (more on this later)
The next section describes how to set up all the above.
How You Do It
Step 1: Set Up An iCloud Account
The first thing you need to do is set up your free iCloud account, if you have not already done so.
However, to achieve this, you need an Apple ID, and there are several ways to set one up. If you do not have an Apple ID, you can set one up either on your iPad itself, or on a PC/Mac.
To set up on your iPad, tap Settings > iTunes & App Store and follow the on-screen instructions.
Apple has provided an excellent Knowledge Base Article which walks you through the Apple ID set up on both computer and other Apple mobiles devices, including the iPad.
The purpose of this article is to Find My iPad, and as the majority of people reading this already have an Apple account, the link above is enough to get those who have not got an Apple account started. For the remainder of this article, the focus is from an iPad perspective.
Your iCloud account must be set up on your iPad to enable the find My iPad service.
To set up a new iCloud account, tap Settings > iCloud > Account, and enter your Apple ID credentials. Tap Done when complete.
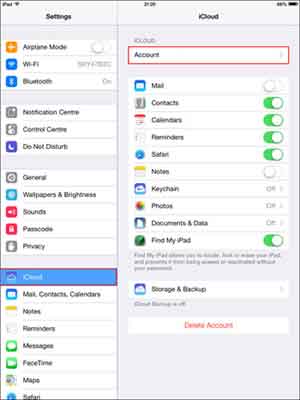 Find My iPad
Setup Your iTunes and iCloud Accounts
If this does not work for you, tap Settings > Mail, Contacts, Calendars > Add Account > iCloud and enter your Apple ID credentials here.
If you still cannot activate your iCloud account, double-check your Apple ID and password you are entering is correct.
When setting up new accounts, always try to balance something you can easily remember, but is not easily guessed. My suggestion to achieve this is for your password to:-
- Be at least 8 characters in length;
- Contain at least one CAPITAL letter;
- Contain at least 1 numeric character.
For example, if you enter the work 'holidays' as your password, substitute certain letters for numbers and even other characters such as symbols to make it difficult to guess, e.g. Ho1iday$.
Also consider passphrases which are more secure. Take the first letters of a famous song chorus and amend some letters into UPPERCASE and symbols. For example, take the famous Elvis Presley song, Return to Sender lyrics:-
We Had A Quarrel, A Lover's Spat, I Write I'm Sorry But My Letter Keeps Coming Back
Then your passphrase could be:- Wh@QA!s1w!SbmlKcB
The best way to create good quality, secure and unique passwords is to use the eComputerZ Strong Random Password Generator Tool.
Alternatively, look at password management tools such as the McAfee True Key product, which will manage your passwords for you, whereby you can set e.g. different 16 complex character passwords for each account.
Step 2: Enable Find My iPad
Once you are successfully logged in to your iCloud account on your iPad device, enable Find My iPad by tapping Settings > iCloud, then swiping the Find My iPad option to the right. Enter your Apple ID password if prompted.
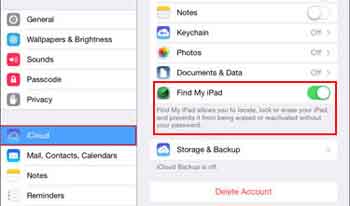 Enabling the Find My iPad Option
Step 3: Access Find My iPhone via iCloud
I hope you are in a position to test this next step, rather than sat in an Internet café desperately trying to work out how to do this!
I strongly advise you to run through this guide now, so you understand what is involved should the worst-case scenario happen.
Login to iCloud on your machine using your Apple ID login details. Click the arrow at the end of the Password field to authenticate, or hit the return key on your keyboard.
Don't check the Keep me signed in option unless you are on a personal machine.
Next, left-click the Find my iPhone option. The icon you are looking for is depicted below.
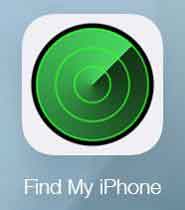 Find My iPhone Icon
If you do not have access to iCloud from a computer, and only have access via another Apple mobile device, you can go to the App Store and down the Find My iPhone App.
Have you updated your device's iPadOS to the latest version? If not, I strongly recommend you do so promptly to take advantage of the latest security features.
Step 4: Interpret The Results
Once you click the Find My iPhone option, the system goes into a locating mode for Apple mobile devices that are switched on and are associated with your Apple ID. This step usually only takes a moment. Authenticate with your Apple ID password if prompted.
Once the missing device is polled and tracked, iCloud displays the location via a green dot on a Google Map.
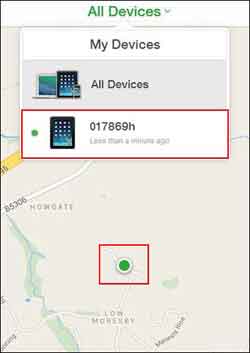 Missing iPad Found
The smaller the green dot is, the more accurate the location of your device is. There are many technical reasons for this which are outside your control.
If you own multiple devices, left-click All Devices at the top of your screen to list them and select the one you are interested in locating.
The controls in the bottom right-hand corner to manipulate the map by:-
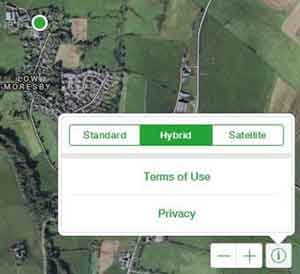 Fing My iPhone
Google Map Manipulation
From here, you simply travel to the location shown and retrieve your device, right?
Well, if only life was that simple. In addition to the dangers you might face, for example, if a deranged criminal with an iPad fixation has their hands on it, there are other scenarios to consider, including:-
- What if the devices changes location?
- What if the device is switched off?
- How can I protect my data, and how can I draw attention to my device, so it is found if lost outside?
In the following section, we have a look at some of these scenarios and the options you have.
Decisions You Need To Make
OK. So, you have located your missing device. What do you do next? Here you have some options and some choices to make, depending on your scenario.
To see the options, left-click the green dot on the map, then left-click the Information button.
The options presented in the top right-hand corner include:-
- Play Sound;
- Lost Mode;
- Erase iPad.
 Find My iPad
iCloud Device Options
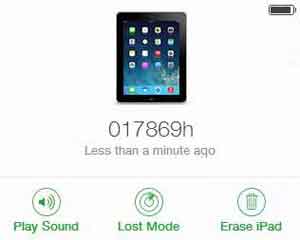 Find My iPad
Device Location Options
If you hover your mouse icon over the battery icon in the top left-hand corner, it displays how much battery life your device has remaining, as a percentage.
If the iPad on screen shows a wallpaper background (usually blue) and icons, it signifies your missing device is switched on and has an Internet connection. If it shows a blank screen, your device in unreachable.
Option 1: Play Sound
Scenario:- Your iPad is misplaced. You know it is around here somewhere, and you have looked everywhere (or so you think!).
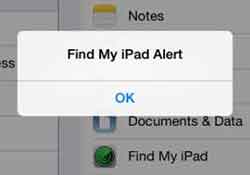
Left-click the Play Sound button in iCloud. A chime sound plays for 2 minutes, even if your device is on mute. It is quite loud too, and a message is displayed on screen for the finder.
 Find My iPad
Sound Alert Message
If you are in close vicinity, you will find your device. It's a bit like ringing your mobile when you misplace it. Tap the OK button to stop the sound.
If you are unable to hear the sound after 2 minutes, select the play sound button again to set it off for another 2 minutes. Remember, you are searching in an approximate location.
An e-mail is sent to your Apple ID e-mail address after each play sound instruction is sent to your device.
If your iPad is offline (no internet connection or switched off), the sound plays the next time it is online (switched on and active Internet connection).
You could also use this option if your device is missing in a public place. However, consider the possibility that this might alert a thief to where your device is.
In this scenario, I suggest you consider activating the Lost Mode option.
Option 2: Lost Mode (Remote Lock)
Scenario:- Your iPad is missing. You have no idea where. You track it to somewhere you have recently travelled to, but are unfamiliar with the area.
Left-click the Lost Mode button in iCloud and follow the instructions. The first thing to do is enter a contact number.
Ensure the number entered is correct and reachable, particularly if it is a mobile number. Click Next to continue.
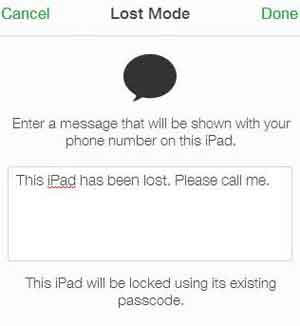
Next, you are prompted to enter a message that is displayed on your device, along with your contact number. The image below shows the default message.
This can be changed to whatever you want. Click Done when complete:-
 Find My iPad
Enter Your Device Display Message
Your device should already have a passcode. If this is not the case, please add one promptly!
Lost Mode prompts you to enter a Passcode if one is not set, and is required to unlock the device when found. Please do not remove this passcode!
This puts your device in Lost Mode. A status bar indicating so is displayed in iCloud, along with a change to the iPad image.
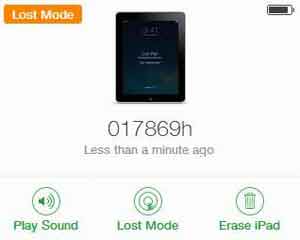 Find My iPad
Lost Mode Enabled iCloud Status
The message and number is then displayed on your iPad. Your device is also locked with your passcode.
If your iPad is switched off, the passcode (if relevant), message and contact number are issued when the device is next switched on.
You also receive an e-mail to your Apple ID address notifying you that Lost Mode is enabled. This is similar to the e-mail sent out when a sound is played.
You can change your contact number and message at any time. Simply click Lost Mode in your iCloud account and amend.
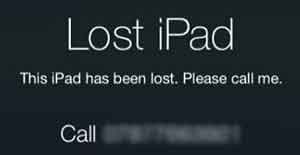 Find My iPad Message and Number
Until your device is found, and you enter your passcode to unlock, this message will remain on display. A confirmation e-mail is sent to your Apple ID account when your device is found.
You can actively disable Lost mode via your iCloud account, for example, if you discover a relative borrowed it and forgot to tell you.
Go back to your iCloud account to track any changes in location over a 24-hour period.
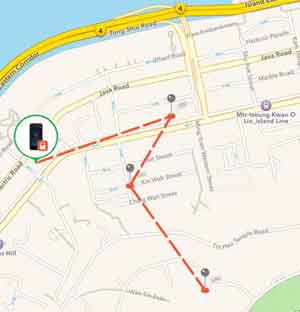 Find My iPad
Lost Mode Location Tracking Example
Image Attributed To Apple.com
Option 3: Erase iPad
Scenario:- Your device is missing. You don't know where it is or when you will get it back. You don't have a passcode applied, and there are sensitive documents stored, which you don't want falling in to the wrong hands.
Furthermore, you could opt for an immediate wipe of your device. However, in most circumstances, this scenario will not play out. Therefore, it is advisable to try options 1 and 2 first. Use option 3 as a last resort.
Once you erase your device, you will not be able to track it.
To erase your device, select the Erase iPad option in your iCloud account. Confirm this is what you want to do by selecting Erase from the warning prompt.
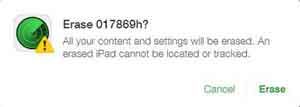 Find My iPad
Erase iPad Confirmation Message
Before you find yourself in this position, make sure you set up iCloud Backup. You get 5 GB of storage, and it means if you erase your device, then find it, you can restore your data!
Follow the subsequent on screen instructions. As with the other options, erase begins as soon as your device is switched on and internet connected.
Assuming your device has a later version of the iPadOS installed, the message and contact number you enter remain displayed on your iPad after the erase process has completed. This is in case your device if subsequently found.
If you come to the sad conclusion your device is lost forever, remember to contact your 4G or 5G provider to suspend or cancel your service, so you don't incur any unnecessary charges.
Find My iPad | Final Thoughts
So, there you have it, a comprehensive look at what options you have with Find my iPad if the worst happens and your devices goes missing.
Unfortunately, theft and misplacement of mobile devices is becoming more popular. This is the main reason why tools such as Find My iPad are developed.
Before we move on to the next section of this tutorial, there are a few loose ends to tie up, mainly around when your missing device is offline:-
- The greed dot turns black, to signify your device is unreachable (To refresh the location status, simply left-click the curved arrow);
- The last known location of your device remains displayed for 24 hours after last contact;
- The status in the options section changes to Old Location if your device is not contactable after 15 minutes;
- Check Notify me when found option to receive an e-mail to your Apple ID account when your missing device is next online.