1
American Megatrends BIOS Update | A Safe, Step-by-Step Guide
The American Megatrends BIOS update is easy, but rushing can brick a system.
Use the TL;DR checklist below before you start.
⚡ TL;DR — Safe American Megatrends BIOS Update Essentials
- ✅ Only update if there’s a clear reason (security patch, bug fix, stability issue).
- 💾 Back up files and **suspend BitLocker** before starting.
- 🔌 Keep your laptop plugged in (or desktop on UPS) — never risk power loss.
- 🛠️ Download BIOS files **only** from your PC or motherboard maker.
- 🚫 Avoid all third-party updater tools — they cause more harm than good.
- ⏳ Once the update starts, **do not touch anything** until it’s finished — wait patiently.
What You Will Learn Today
- Key preparation steps before attempting any updates, such as suspending Windows BitLocker, and deciding if you need to update your BIOS right now
- How your American Megatrends BIOS Update can be completed in just 6, safe, easy steps. I update my Lenovo Laptop's BIOS as a practical example
- Alternative methods for undertaking BIOS updates, including inbuilt motherboard tools for the computing enthusiasts, such as the ASUS EZ Flash
- Learn about the different recovery options available if the worst happens and your BIOS update fails
- Discover a multitude of answers to the most common BIOS update questions that people are asking, to help strengthen their knowledge or address a problem that is causing them pain
Start here: pick the path that matches your device.
What Is American Megatrends (AMI) And What Does BIOS/UEFI Mean?
The Basic Input Output System (legacy BIOS) or Unified Extensible Firmware Interface (UEFI and the modern BIOS extension) is the small program that checks your computer is in working order before your operating system loads. Like any other software program, new updates are released by the manufacturer to improve stability, security, and the performance of your device.
American Megatrends Inc. (AMI) developed their Aptio BIOS/UEFI firmware, which is customised by computer and motherboard manufacturers, such as Dell, HP, Gigabyte, ASRock etc., to work specifically with their systems. This is why it is important to only install the BIOS software issued by your computer or motherboard manufacturer.
Before You Start - Safety First
- Updating your Firmware / BIOS/ UEFI (they all essentially mean the same thing to the everyday computer user) is risky. Please proceed with caution.
- Decide if you really need to update your computer's BIOS at this time. If there is no need, don't do it.
- Only download BIOS update files from your computer provider's support page, and only for your exact model of PC or Laptop (Dell, HP, Lenovo etc.)
- Always use the BIOS update files and tools provided by the manufacturer of your computer's motherboard for custom-built devices. Never use BIOS update files or tools meant for a different model or hardware — this can permanently damage your system.
- Avoid using third-party driver updater tools for your BIOS updates. They cause more problems than they are worth.
- Keep your computer powered on, or ensure your Laptop is ideally fully charged, for the duration of the update process. It is safer to keep your Laptop plugged into main power at all times during the BIOS update.
- Ensure you suspend Windows BitLocker before proceeding, and have your BitLocker recovery key available
- BIOS updates usually go smoothly, but it’s essential to save your work, close applications, and back up your important files before proceeding — just in case
- Do not change settings, press any keys, or remove the USB stick during the update.
- Be patient and do not turn off your computer during the update process
- If something does go wrong, refer to the BIOS POST Beep Codes — Meaning, Fixes & Safe Recovery page, and the AMI BIOS Beep Codes — Full Reference Guide to POST Beep Errors page for help and support.
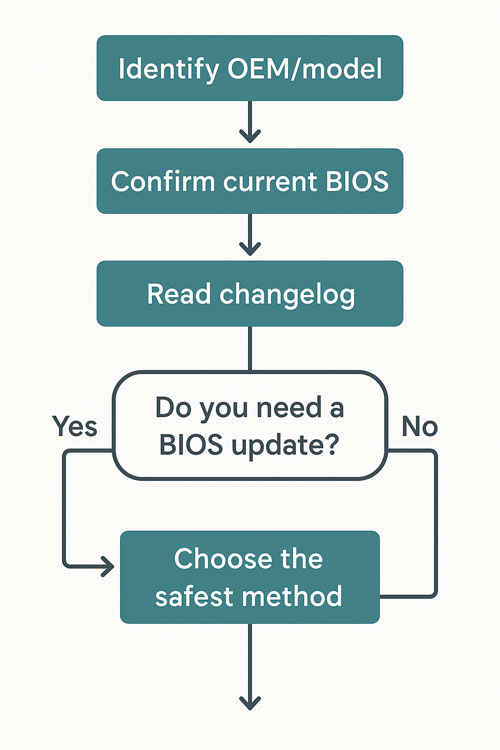
Should You Even Bother Updating Your BIOS?
One of your first considerations is whether you actually need to undertake an American Megatrends BIOS update. I rarely update my BIOS unless there's a clear benefit — I prefer system stability over chasing the latest updates. If there is no need, I don't update.
I do, however, periodically check the vendor change logs of the latest release of their BIOS firmware. If the summary of changes includes security fixes or improvements to system stability, for example, only then do I run through the update steps.
The Infographic below shows the decision-making steps and considerations for updating your computer's BIOS.
Decide Your Preferred BIOS Update Method
There are three ways to update your computer's BIOS. They are:-
- The easiest and most common method — using the Windows OEM BIOS Updater
- The 'DIY' way, undertaken by computer enthusiasts, often with specialist motherboards — The UEFI Built-in Tools
- The American Megatrends BIOS update using the AMI Firmware Update advanced method — The AMI Aptio setup utility update using AFU tools
Each approach has its pros and cons, as outlined in Table 1 below. Click or tap each button for each section.
| Pros | Cons |
|---|---|
| Simple - Run OEM EXE, reboot, done. (Best for Dell/HP/Lenovo/Acer). |
BitLocker may prompt for recovery if you don’t suspend it beforehand. |
| No USB prep needed. | Requires working Windows session and admin rights. |
| Safest for brand PCs; OEM tested for your exact model. | Less control/visibility during the flash (update) process. |
| Pros | Cons |
|---|---|
| Runs outside Windows; fewer software conflicts. | Requires FAT32 USB and navigating UEFI menus. |
| Preferred for ASUS/MSI/GIGABYTE/ASRock motherboards. | Wrong file or power loss can still brick (as with any method). |
| Often includes recovery features (CrashFree, DualBIOS, FlashBack/Plus on supported motherboards). | Some motherboards block downgrades (no rollback). |
| Pros | Cons |
|---|---|
| Scriptable and powerful; useful when OEM explicitly instructs it. | Advanced; wrong usage risks bricking. Usually, not needed for everyday users. |
| Can target specific Aptio platforms as directed. | Not universally compatible; follow OEM directions only. |
| Helpful for certain service scenarios under OEM guidance. | No recovery safety net if used incorrectly; stick to OEM tools when possible. |
Recommendation: DO NOT USE AFU unless your OEM’s instructions specifically tell you to.
Table 1 - The Pros and Cons of Each BIOS Update Method
The Best 6-Step Approach to Updating Your BIOS Using Windows OEM Files
As mentioned in Table 1 above, this is the most appropriate method for pre-built computers 'straight out of the store', such as HP, Dell, and Lenovo.
The 6-step approach guides you through the process, where I update one of my Laptops. This is followed by the answers to some common issues when updating in this way. We then look at the Computer enthusiast's method, and then the American Megatrends BIOS update method using the AMI AFUWIN utility.
Follow each step carefully — skipping steps or cutting corners increases the risk of errors. There is an interactive and downloadable checklist for you to use at the end of the process.
Step 1 — Identify your Exact Computer Model and BIOS Version
The easiest and fastest way to identify your computer model and motherboard is to Press Win+R → type msinfo32 → Enter.
In the System Summary, note:-
- System Manufacturer and Model
- BIOS Version/Date
It is also worth noting your BaseBoard Manufacturer and Product for completeness, although this is usually required for those with custom build computers only. “BaseBoard” is simply another name for “motherboard.”
 American Megatrends BIOS Update
Identify Your Computer Model and BIOS Version in Microsoft Window
Another way you can identify your BIOS version is to run the following command in PowerShell:-
- Run the following command in PowerShell Get-WmiObject -Class Win32_BIOS
I usually run the msinfo32 command. Why complicate matters? The image below shows the PowerShell command outcomes.
 American Megatrends BIOS Update
PowerShell BIOS Version Command
Do you need to know other ways to determine your BIOS version? Have a look at how to check your BIOS Version for Windows, Linux, and macOS.
The Windows Management Instrumentation Command-line (WMIC) command, to identify your BIOS version via the Command Prompt, will not be available from Windows 11 25H2 onwards. However, the command is available below, should you choose this method instead, and whilst you still can.
- Run the following command in the Command Prompt wmic bios get smbiosbiosversion
Step 2 — Read The OEM Release Notes
Your next step is to go to your computer's official support page. Then download and read the release notes, also known as the change log, for the latest release of the BIOS software available, and for the exact model of computer that you own.
Check the BIOS version available against the version installed on your computer. Is it different? Supported computers generally have a newer BIOS version available to be installed.
In my example, the release notes for my Lenovo Laptop documented a fix for a security issue.
 American Megatrends BIOS Update
Lenovo BIOS Changelog Showing A Security Issue
The Intel website states the security issue is a BIOS firmware or authenticated code module problem for some Intel CPU’s, that may allow escalation of privileges or information disclosure.
This is a high severity vulnerability, and, following the flow chart above, there is a justifiable reason to update my BIOS version now.
Step 3 — Download Your OEM BIOS File
As a reminder, only download from the official website, and for your exact model of computer. I find searching for updates using my computer's serial number, rather than the model, is more accurate. You often find the serial number printed on the back of your computer, or on the bottom of your Laptop.
If you enter the following command into your command prompt, your device's serial number displays on screen:-
- wmic bios get serialnumber
To ensure the BIOS update file you have downloaded is the genuine OEM file, from a genuine OEM site, and has downloaded properly without any errors (file integrity), use the File Checksum and Signature Verifier tool.
The supplier should give you the opportunity to copy a series of numbers and letters, called the hash value, that is unique to the file you downloaded. If the digits do not match with the file, the tool shows a mismatch result. If all is good, the tool shows a match outcome.
Step 4 — Complete the Pre-installation Checklist
Review the interactive checklist below and ensure you complete each task before you run the BIOS updater file.
Click the print button and either print out onto paper, or print to PDF (Save as PDF) for a local copy of the checklist.
The Pre-Installation Checklist
Please use this interactive checklist to ensure you follow all the steps, and in the right order.
Step 5 — Run the BIOS Update File — But Do Not Touch Anything
Run the EXE, or executable as an administrator, to avoid any potential permissions issues. This is an unlikely problem in my experience, but better to be safe than sorry.
Now, simply follow the on-screen instructions. If you are uncertain, accept the default options.
Below are a couple of screenshots that show what the Lenovo BIOS Update Utility looks like. The installation wizard is familiar to those who have installed software before.
 American Megatrends BIOS Update
Lenovo BIOS Update Utility Wizard Opening Screen
 American Megatrends BIOS Update
Lenovo BIOS Update Utility Wizard Last Screen
After clicking Finish, your computer will reboot, but before it loads as normal, a command prompt appears, and prints on screen the step it is taking to update, or flash, your BIOS. The screenshot below shows part of what appeared of my Laptop screen when it rebooted.
At this stage, there is usually no need to abort the process. Let the update utility complete its task, and wait for the device to reboot. Do not switch off your device, unplug anything, or press any keys on your keyboard.
My 7-year-old Laptop took about 4 minutes to run the BIOS update and reboot to the login screen. This is after I put all the recommended safety measures in place. I encountered no issues. The BIOS update file is small, typically around 5–6 MB, so the update process is quick, and likely faster on more modern computers.
 American Megatrends BIOS Update
Lenovo BIOS Flashing in Action
Step 6 — Complete the Post-Installation Checklist
Review the interactive checklist below and ensure you complete each task after you run the BIOS updater file.
Click the print button and either print out onto paper, or print to PDF (Save as PDF) for a local copy of the checklist.
The Post-Installation Checklist
Please use this interactive checklist to ensure you follow all the steps, and in the right order.
American Megatrends BIOS Update — Success check (2 minutes)
If everything boots normally, do these quick checks to confirm the update applied and your security settings are back on.
- Confirm the BIOS version: open Windows Search → type
msinfo32→ check BIOS Version/Date. - BitLocker: if you suspended it, confirm it has resumed protection (Control Panel → BitLocker Drive Encryption).
- UEFI settings: if anything feels “different”, check boot order, Secure Boot, and any custom settings you noted (fan curves / XMP / virtualisation).
- Keep the file: store the BIOS file + your notes somewhere safe in case you ever need recovery.
Troubleshooting Common Issues with Windows BIOS Executables (Q&A)
Have a look at the list of common issues when upgrading your BIOS, using your computer provider's BIOS Update File/EXE, and the quick solutions.
Why does my PC restart, but the BIOS update never installs?
This usually means the update didn’t copy to the system firmware correctly. Try running the update tool again as an Administrator. If it still fails, check if your antivirus or BitLocker encryption is blocking the update. Temporarily disabling these often solves this type of problem.
The update tool says, “This BIOS is not for your system.” What does this mean exactly?
It means you may have downloaded the wrong file. Even small differences in model numbers matter. Go back to your OEM’s support page and enter your exact product model or service tag/serial number, then re-download the latest BIOS update listed. You may also see messages like “Image not for this model” or “Security verification failed”. A corrupted BIOS file can also give the same messages — it’s worth downloading again and trying once more.
My update gets stuck when installing. What should I do?
Firstly, do not panic! BIOS update EXEs sometimes freeze if background programs are interfering. Close all your applications and files, make sure your laptop is plugged in (if using a laptop), then try again. If it keeps happening, try downloading the same file but run it from a bootable USB pen instead of Windows. This is more complicated, but see the computer enthusiasts method below for further details. Also be patient — pauses are normal, and interrupting the process is a higher risk.
After running the update tool, my PC shows a black screen for several minutes. Is this normal?
Yes. During the BIOS flashing process, the screen may stay black and your computer's fans may rev up. This can last several minutes. Do not turn off your computer. If it takes longer than 30 minutes with no signs of life, seek support from your computer's manufacturer before forcing a power-off.
The BIOS update tool closes immediately without doing anything. Why is it doing this?
This often happens if the tool requires Administrator rights. Right-click the file and select Run as administrator. If it is still an issue, check your OEM’s release notes. Some updates must be installed in order, i.e., you cannot skip multiple versions to the latest release.
The update fails and says, “Battery must be charged above 30%.” But my laptop is plugged in!
Suppliers insist on a minimum battery level, even when plugged in. This is to prevent sudden shutdowns if there happens to be a power failure. Let the battery charge past the required percentage, then try again.
Why do I keep seeing “BIOS Update Failed – Secure Boot or BitLocker enabled” message?
Some OEM BIOS update files cannot flash the BIOS when Secure Boot or BitLocker is active. Suspend BitLocker (Control Panel → BitLocker → Suspend Protection) and try again. Secure Boot does not usually trigger a BIOS update issue, but check your OEM’s instructions just in case.
After the update, Windows says, “Inaccessible Boot Device” and will not boot at all. What do I do now?
Sometimes BIOS updates reset your BIOS settings (e.g., SATA mode or boot order). Enter BIOS setup (often F2/DEL on boot) and check storage/boot settings. Restore them to how they were before. If unsure, try “Load Default Settings,” save, then reboot.
The BIOS update tool says, “You already have this version,” but I know I don’t.
Either the version is already applied, or the tool is misreading. Confirm your current BIOS version (type msinfo32 in Windows search). If it matches, you don’t need to run it again. If it’s lower, download the update again and make sure it is for your exact model.
What if the update fails halfway and my computer will not turn back on? Am I stuck?
This is rare but serious. Many modern PCs have a BIOS recovery mode. Check your OEM’s support page for the key sequence (for example Windows + B on some HP devices). You may be able to restore from a USB pen with the BIOS file. If recovery doesn’t work, you will need your manufacturer’s (or a repair shop’s) assistance.
Watch Official OEM BIOS Update Videos (By Brand)
To support your American Megatrends BIOS Update, or your OEMs version of the AMI BIOS to be precise, have a flick through the video carousel below to see if your computer manufacturer's video instructions for updating your BIOS is listed.
The video's below are the official OEM guides only. Pick your brand, then press play.
 ▶
▶
 ▶
▶
 ▶
▶
 ▶
▶
 ▶
▶
The Computer Enthusiast's BIOS Update Method
I call this method the computer enthusiast's method because it is more involved than simply running a downloaded BIOS file.
Advanced users generally build their own computers, and buy specialist motherboards that have a built-in “flasher”, that requires the use of customised “flashing tools” to update the BIOS. These include, for example:-
- ASUS → EZ Flash / EZ Flash 3 Tools
- MSI → M-Flash Tool
- GIGABYTE → Q-Flash / Q-Flash Plus / @BIOS Tools
- ASRock → Instant Flash Tool
The criteria for whether to update your BIOS or not, and all the safety considerations, apply just as much to this method as the Windows installer method.
Steps 1-4 above equally apply to this method. For example, reading through the BIOS release notes, determining the exact model of your motherboard brand (BaseBoard) and sourcing the exact BIOS file for download are critical to a successful update.
For this method, however, you need a USB stick which is formatted with the FAT32 file system. Yes, this file system is over 30 years old, and has long since been superseded by the NTFS File System format. However, FAT32 is universally recognised by BIOS firmware, unlike NTFS. It is therefore safer to use the FAT32 format.
Once you have done this, extract the downloaded BIOS file and copy it to the USB pen. Do not put it inside a folder on the USB pen. Copy it to the 'root' of the USB pen.
Now, reboot your device, and enter the BIOS/UEFI, usually through pressing a specific key or combination of keys on the keyboard, at the appropriate time (very early in the boot process — keep an eye out for the prompt on screen). For example, the F2 key provides access on a Dell computer.
Once you are in the BIOS/UEFI, launch the update/flasher utility inside the BIOS/UEFI and run the flash file, “force-flashing” your motherboard. The UEFI sometimes has a launcher in the Advanced menu.
From here, be patient and wait for the update to complete. Do not panic if your computer reboots more than once during the update process. Do not touch the USB pen. After the update is completed, follow the post-installation checklist above. Did you remember to suspend BitLocker?
Troubleshooting Common Issues with BIOS Update Flashing Tools (Q&A)
Have a look at the list of common issues when upgrading your BIOS, using your motherboard manufacturer’s flashing tools and a USB pen drive, and the quick solutions.
How do I know if I even need to update my BIOS?
Only update if the release notes or changelog from your motherboard manufacturer (e.g., ASUS, MSI, GIGABYTE, ASRock) mention fixes or features you need (security fixes, new CPU support, stability improvements). Check your current BIOS in UEFI or Windows (msinfo32) and compare it with the version on your exact motherboard’s support page.
My USB stick isn’t showing up in EZ Flash, M-Flash, Q-Flash or Instant Flash. What should I do?
This is almost always down to the wrong file format on the USB pen. Format the USB pen to FAT32 and copy the BIOS file to the root of the drive. Plug the USB pen into a USB 2.0 port. Some boards need a specific filename (e.g., ASUS BIOSRenamer, GIGABYTE Q-Flash Plus). Try again and reopen the flash tool.
The tool says, “Invalid BIOS file.” Why won’t it recognise my update?
Confirm you downloaded the correct BIOS file for your exact motherboard model (and the same revision number). Unzip the download to get the real BIOS file (often .CAP, .ROM or .BIN). Some tools require a specific filename. If you suspect corruption, download again and retry.
What if the BIOS update fails halfway through? Will it break my computer?
Many motherboards have recovery features if the worst happens (see the recovery section further down the page). For instance, ASUS has USB BIOS Flashback, GIGABYTE has Q-Flash Plus (no CPU/RAM), and ASRock has Crashless BIOS. MSI recovery can be more limited on some models/revisions. Check your manual’s recovery section before flashing so you know the steps.
Can I update my motherboard's BIOS from inside Microsoft Windows (@BIOS, Live Update, etc.) or should I use the UEFI tools only?
You can update in Windows, but it is much safer to flash using the dedicated UEFI tools: ASUS EZ Flash, MSI M-Flash, GIGABYTE Q-Flash, ASRock Instant Flash. Windows can crash, and background apps add risk. Use UEFI tools unless the manufacturer explicitly states a Windows-only method.
Is it normal for my computer to reboot multiple times during the update process?
Yes, multiple reboots and brief “hangs” are normal while different firmware regions are programmed. Be patient while the update completes. Only force power-off if nothing changes for well over 30 minutes and your manual says it’s safe.
Will updating my BIOS erase my document files or the Windows Operating System?
No. BIOS updates do not touch your document files. They can often reset UEFI settings (boot order, XMP, fan curves). Before updating, note your settings or take photos so you can restore them quickly.
Why won’t my computer boot from the USB Pen with the FAT32 file format and the BIOS file in the root directory?
For EZ Flash, M-Flash, Q-Flash and Instant Flash, you do not boot from the USB pen like an OS installer. Boot into UEFI, open the flash tool, and it will detect the USB pen. Special cases (e.g., GIGABYTE Q-Flash Plus) use a dedicated USB port and button without entering UEFI.
After updating, I get a black screen and Windows won’t boot up. What do I do now?
Try clearing the BIOS configuration (CMOS) using the jumper method or by removing the motherboard battery (follow the vendor instructions). Re-enter UEFI and confirm storage mode and boot order. Restore custom settings. If still stuck, follow your vendor’s recovery procedure (Flashback / Q-Flash Plus / Crashless BIOS) with a known-good BIOS file.
What is the safest way to avoid bricking my computer during the BIOS flashing process?
Use a UPS (or laptop on battery), flash from UEFI tools only, use a FAT32 USB pen, double-check the exact model and BIOS version, read the vendor notes, close applications, and never interrupt once the process starts.
Watch Official Specialist BIOS Update Videos (By Motherboard Type)
To support your American Megatrends BIOS Update, or your OEMs version of the AMI BIOS to be precise, have a flick through the video carousel below. See if your motherboard or BaseBoard manufacturer's video instructions for updating your BIOS is listed.
Motherboard BIOS update videos
The videos below are guides for motherboard tools. Pick your brand, then press play.
▶
 ▶
▶
 ▶
▶
 ▶
▶
Note: You do not need a 32GB USB pen as the tutorial suggests — a smaller USB pen is fine.
The AMI Aptio Method For Advanced Users
This is where I find a lot of the confusion. People see the AMI logo, or are aware of “Aptio”, and they assume it must be an American Megatrends BIOS update they have to apply to their computers. They then go down the rabbit hole of searching for, and getting confused, with the Aptio IV (4), or Aptio V (5) instances, and then downloading and trying to use the AFUWIN utility.
To clear up any misunderstandings, Aptio is the brand name American Megatrends Inc. (AMI) uses for its modern UEFI firmware platform, i.e., the modern BIOS.
Older computers that do not have the AMI UEFI firmware installed, use the AMIBIOS firmware platform, i.e. the old legacy BIOS.
So new computers use Aptio, built on the new UEFI standard, which replaces the old legacy BIOS, and Aptio v5 is currently the latest version.
The different versions of Aptio can be likened to the different versions of Microsoft Windows. When Microsoft released Windows 11, it replaced the previous Operating System, Windows 10, as an improved O/S offering better support, functionality and security, even though Windows 10 was still available and supported.
The same logic can be applied to Aptio IV vs Aptio V. Version 5 is the more modern instance of the Aptio UEFI platform, offering improved features and security.
American Megatrends Inc. provide firmware update utilities called AFUWIN (runs in Windows) and AFUDOS (runs in the Command Prompt).
The screenshot below shows the American Megatrends BIOS update using the AFUWIN tool. Look at how complicated and granular, from the setup tab, it is compared to the other methods.
 American Megatrends BIOS Update
Aptio v5 AFUWIN Firmware Update Utility
This utility is for experienced computer users and computer manufacturers only, in my opinion. The granular nature of the setup options bypasses the safety measures built in to your OEM's BIOS software releases, and drastically increases the risk of “bricking” your device, if you use this tool without the proper knowledge.
This is precisely why it is much safer for you to stick with the least risky BIOS update method, and to stick with your OEM's BIOS software files. There is no need for you to undertake a “generic” American Megatrends BIOS update.
Quick emergency guide (don’t panic)
Black screen for a few minutes
Often normal during flashing. Fans may ramp up. Do not power off.
10–30 minutes of “nothing”
Wait a bit longer. Only intervene if your OEM instructions say it’s safe.
Over 30 minutes / won’t boot
Move to recovery: vendor recovery mode / Flashback / Q-Flash Plus / service support.
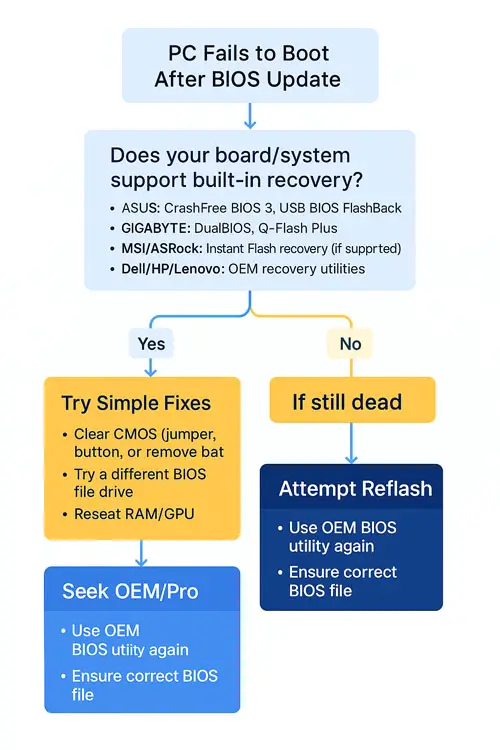
What Are Your Recovery Options If Something Goes Wrong?
Do not panic if the worst happens and your computer fails to load after updating your BIOS. Your computer and motherboard manufacturer provided options for recovering a failed BIOS update. There are also a couple of “techie” options available to you as a last resort.
The first thing to do is check your OEM support section, or simply Google, for their BIOS recovery tools. For example, Dell has a page with instructions and video for using their BIOS Recovery 3 (BR3) tool to help resolve the problem. It uses a recovery or backup BIOS file located on your hard drive.
If you are a computer enthusiast and have one of the popular motherboards, each has their recovery tools, for example ASUS has the CrashFree BIOS 3 tool. Check your manufacturer's support page for instructions.
In the majority of cases, these tools are successful in recovering from a failed BIOS update. However, occasionally, they will also fail, so what do you do next?
If you can, open the case or chassis of your computer, and, following your manufacturer's instructions, place the jumpers on the motherboard on to the designated pins to clear the BIOS settings on the CMOS chip.
When I was a fledgling computer technician, I had to deal with corrupted BIOS software, and BIOS password lockouts, often when computers were passed on to someone else, and the previous owner had put a password onto the BIOS settings. Moving the jumpers (little black plastic sleeves) onto different motherboard pins to remove the unknown password was a joy!
Furthermore, removing the CR2032 battery from your motherboard clears the CMOS chip settings. Try the BIOS update again if this approach clears the issue.
Other computer technician tips and tricks include:-
- Try a different USB pen and another USB port, just in case the issue lies here
- Try a different recovery utility if your manufacturer provides one
- In some cases, reseating the RAM and Graphics Card have resolved a failing BIOS update
If you are still having problems at this stage, or you are not comfortable following any of the recovery steps, stop and contact your vendor's support, or go to your local computer repair shop for help. This is crisis recovery, and it is better to seek help than try to guess your way out of the issue.
Computer professionals can use the CH341A BIOS Recovery Programmer to fix corrupt BIOS software on the chip that is preventing the computer from booting, for example. This is very much out of scope here, but I included for awareness.
Take a note of the following details to give your repair shop a clear picture of what is happening:-
- Record the BIOS beep code
- Note what the LED lights are doing on your computer
- Note any error messages on screen, and what happens when you switch your device on, e.g., does it restart, hang etc?
Moreover, for awareness, keep an eye out for “UEFI Firmware Capsules”. These are packages aimed at updating your BIOS in a much more secure and complete way.
Below is a downloadable infographic recovery flowchart of steps to take if you find yourself with a BIOS failure to deal with.
It is also worth noting that if you have a BIOS / UEFI issue outside updating your BIOS version, then your computer is likely to issue a Power-On Self Test (POST) beep code. This is to signify the nature of the issue, which is likely hardware related.
If you find yourself in this position, head over to AMI BIOS Beep Codes — Full Reference Guide to POST Beep Errors, to determine what the problem is, and guidance on how to fix.
Do not forget to have a look at the BIOS POST Beep Codes — Meaning, Fixes & Safe Recovery page for a structured approach for troubleshooting BIOS issues. Furthermore, have a look at the UEFI BIOS vs Legacy BIOS | Differences, Pros/Cons, and Safe Switching page for more information on the UEFI standard.
American Megatrends BIOS Update — Ask a Question
Not sure about your specific model?
Have a BIOS update that doesn’t look like the guides above?
Click the button below to ask me a question — include your brand, model, and what step you’re stuck on.
I’ll help you find the right official support link and the safest method for your computer.
The American Megatrends BIOS Update References
Review the list of high-quality and relevant references to support your BIOS update journey
- Microsoft Support — Check BIOS version with System Information. Open
- Microsoft Learn — Suspend BitLocker before updating firmware. Open
- ASUS Global Support — EZ Flash, CrashFree BIOS, BIOS FlashBack. Open
- MSI Support — M-Flash BIOS update guide. Open
- GIGABYTE Support — Q-Flash, DualBIOS, Q-Flash Plus. Open
- ASRock Support — Instant Flash guide. Open
- Dell Support — BIOS update instructions + BitLocker considerations. Open
- HP Support — BIOS update and recovery tools. Open
- Lenovo Support — BIOS update utility + System Update. Open
American Megatrends BIOS Update Key Takeaways
- Always put the recommended safety measure in place before attempting any BIOS updates
- Use the decision tree and check the changelog to decide if you really need a BIOS update right now
- Only download BIOS update file from your brand’s support page and for your exact model of computer or motherboard
- Remember to suspend Windows BitLocker and keep power connected before updating
- Everyday users should follow the 6 steps for updating using Windows files provided by your OEM
- Computer enthusiasts should use their motherboard's built-in BIOS flash tools and a FAT32 formatted USB Pen
- Never interrupt a BIOS update!
- All non-professional computer users should avoid the provided American Megatrends BIOS Update tools due to safety reasons
- If something goes wrong, follow the recovery flowchart and undertake recovery steps you are comfortable with, including tools such as CrashFree BIOS from ASUS and resetting the CMOS settings
Was this page helpful?
Thanks! ✅
Join The Human Byte — Get The Ultimate BIOS Update Guide
- Receive the ultimate BIOS update pack
- Includes a set of checklists and flowcharts to support your BIOS update process
- Also includes the full set of common FAQs from users who experience BIOS update issues
- Receive regular emails with practical information you can use
- I only use your e-mail for the newsletter. Unsubscribe anytime.
Is There A Better Way Than This?
Some professionals recommend you don't update your BIOS unless absolutely necessary. This is good advice if you are a true novice.
Do you agree? Do you know of a better, easier way to update your AMI BIOS than what is described in this article?
Other Visitors Opinions
Click below to see contributions from other visitors to this page...
Abra A5 v5.3
I did one before with my friend's Laptop, which was an Asus brand. When I see good instructions, I can follow easily.
1) Being sure about the power …
BIOS Access When Fast Boot Is Enabled
Question: How to disable fast boot (no USB functionality) if the MOBO only has USB ports and no PS2?
Answer: By disabling USB, then USB keyboard is …
La PC Menciende Pero No Responde A Ninguna Acción
Hola mi nombre es Carlos Torres.
La pc enciende pero en el pre arranque no responde a ninguna accion. Solo queda en la pantalla una imagen con el logo …
How To Reset BIOS
Thanks for all your information about AMI...
Please tell me how I can reset the BIOS password on my Sony VAIO CW Series (VPCCW)
After I updated my …
BIOS Update Via Program or Software Utility Available
I have an American Megatrends BIOS Motherboard. However, in the BIOS Setup there is NO OPTION for SATA Controller and other Configurations.
I have a …
BIOS Update By Command Prompt
I update the American Megatrends BIOS using the following method:-
1. Get the correct BIOS .ROM File from the AMI web Site or my Computer provider's …