How To Clone A computer
Understanding how to clone a computer is an essential skill for everyday computer users, and is easy to learn and do.
After reading this article (or listening to the article in the video below), the skills obtained enable the convenient backup, and restore, of your entire computer system, including your operating system and all its settings, device drivers, applications and local files.
There is no more manually loading of all these parts that make up your computer system that can take up hours of your valuable time.
I have a simple way to clone your computer, which is completely free. However, you need somewhere to store your image file, such as an external hard drive, which may incur a small cost.
In this article, we first look at the reasons for cloning a computer; from data backups to redundancy reasons. We then look at the tools you require for cloning, and how to use them.
Once you have a cloned your device, the process doesn't stop there. It is a regular, iterative process to capture all the changes you make from the point the clone is taken.
Join The Human Byte — Get The Ultimate BIOS Update Guide
- Receive the Ultimate BIOS Update Pack
- Includes a set of checklists, flowcharts, and your Beep Code Finder support your BIOS update process
- Also includes a full set of eBooks including a Survival Guide and step-by-step Support Guide
- Receive regular emails with practical information you can use
- I only use your e-mail for the newsletter. Unsubscribe anytime.

Why Would You Clone Your Computer?
Cloning your device provides you with options as part of your routine computing tasks. A clone of your computer gives you a snapshot of all your system elements, including the operating system, device drivers, settings, software applications and files.
If your computer becomes corrupted, or is infected with malware, you have a copy of your computer that can be restored with minimal or no data loss. This is also a great time saver as you do not have you manually install all the software from scratch, which is useful if you are upgrading your hard disk drive, or replacing your computer with a new one.
Another reason for cloning your device is to give you protection when modifying your computer, for example, installing or upgrading new software, or changing unfamiliar settings that cause your system to become unstable, or even worse, permanently cut you off from the Internet!
Alternatively, if you are fortunate enough to have two similar computers, you can take an image of the computer you use daily, and deploy it onto the other computer. This way you can test the changes you want to make, and gauge their effect, without compromising your primary system.
Having two similar systems also provides redundancy, in that your primary system can be quickly restored to your backup system, whilst you investigate the issue(s) with your primary system.
Not everyone is blessed with the finances to own multiple computer systems, so it's not the end of the world if you do not fall into this category (I certainly don't).
In the next section, we look at what tools you need to create a clone of your computer.
What Tools Do You Need to Clone Your Computer?
There are only two, free, software applications you need to take an image of your computer. They are the Rufus Bottbale USB Drive, and Clonezilla.
Rufus Bootable USB Drive
Rufus is a free and open-source tool for creating bootable USB drives. It's designed to be fast and easy to use, with a simple interface that allows you to create bootable USB drives for various operating systems, including Windows, Linux, and other utility programs.
The reasons to use Rufus include:-
- Compatibility with most modern Windows operating systems, and the ability to create bootable USB drives for both BIOS and UEFI systems
- Rufus has a simple and intuitive interface that makes it easy to create bootable USB drives without any technical knowledge or expertise
- It is fast and reliable, allowing you to create bootable USB drives quickly and with minimal errors
- There are various customization options, including the file system, cluster size, and partition scheme
- Rufus is a portable tool, meaning you can run it from a USB drive or other external storage device without installing it on your computer
I like the fact Rufus is portable, and can be set up on any storage device type. I do tend to use USB pen drives, and they are convenient and have the capacity these days to host all the files you need for cloning.
To use Rufus, you need to download and install it from the official website, then follow the on-screen instructions to create a bootable USB drive.
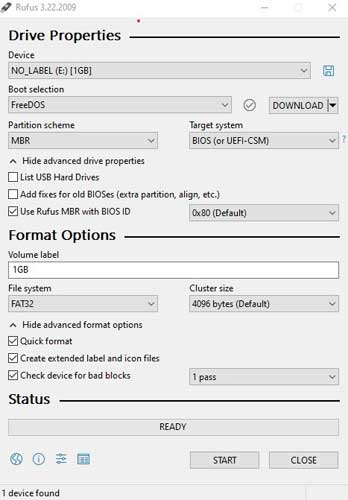
You will then need to select the Clonezilla ISO file (more on this soon), then customize the settings as needed. The image below shows you some of the options that come with Rufus. It is all check boxes and drop-down menu options, so it is easy to use.
 How To Clone A Computer
Rufus USB Bootable Drive
Clonezilla Partition and Disk Imaging/Cloning Program
Clonezilla is a free and open-source disk cloning and imaging software that allows you to create backup copies of your hard drive or partitions. It's designed to be an easy-to-use and reliable tool for creating complete backups of your system or migrating your data to a new computer.
The reasons to use Clonezilla include:-
- The capability to clone entire disks or individual partitions, allowing you to create an exact copy of your hard drive
- Clonezilla supports multiple file systems, including NTFS and FAT32
- It can compress and encrypt your backup images, ensuring that your data is safe, secure and minimal size (even though the size of a clone image file can be gigabytes in size)
- It also has several modes, including device-to-image, device-to-device, and device-to-network, making it a versatile tool for various backup and cloning scenarios.
Clonezilla also supports network deployment, allowing you to create backup images over the network or deploy them to multiple computers simultaneously. This is more for organizations or for IT Professionals that do lots of device cloning as part of their role.
To use Clonezilla, you need to download the ISO image from the official website and copy it to the bootable USB drive that you created with Rufus. Then, you can boot your computer from the Clonezilla media and follow the on-screen instructions to effectively create a backup image of your computer.
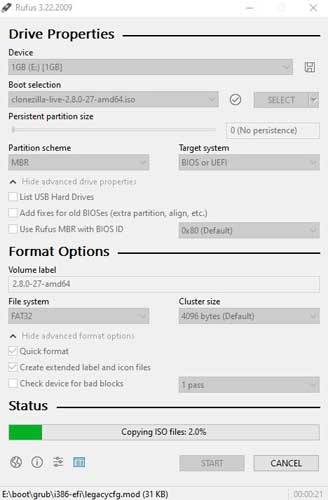
The image below shows how I set up Rufus with the Clonezilla ISO when cloning my own computer.
 How To Clone A Computer
Rufus USB Bootable Drive With the Clonezilla ISO
How To Clone A Computer | My Approach
The following steps explain what I do exactly to clone my home Laptop, and, just in case you have jumped straight to this section, before you do anything else, you need to:-
- Download the Clonezilla ISO file and copy it to a good-sized USB pen
- Use Rufus to create a bootable USB pen
I use an external solid state hard drive to keep the copies of my image files. After I complete steps 1 and 2, I ensure both the bootable USB pen and my external hard drive are plugged into my computer.
I then reboot my Laptop. However, with modern devices, there are a couple of BIOS or UEFI changes you need to make, in order for the USB pen and Clonezilla application to work properly.
 How To Clone A Computer
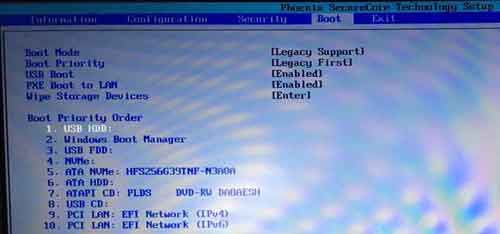
UEFI Changes To Enable The Rufus Bootable USB Pen
If your device supports Secure Boot, then it needs to be temporarily disabled in your BIOS/UEFI. Secure Boot is a computing standard that essentially checks all the firmware and software on your machine to enure each is legitimate. On my Laptop, it is in the Security menu.
The next step is to change the boot mode to Legacy Support, from UEFI in the case of my Laptop. This step essentially disables UEFI and re-enables the BIOS.
You also must enable Legacy First in your Boot options. This step allows your USB Pen to work at the “pre-boot” level.
Ensure you save your changed settings and exit the UEFI/BIOS to reboot your machine.
Attention!
DO NOT forget to change your BIOS/UEFI back to their original settings when you have finished the cloning process.
On reboot, the bootable USB PEN loads, and you are asked to select your Keyboard. The first option is usually fine. Next, and if you are asked, select the option to load the Clonzeilla ISO file
 How To Clone A Computer
Rufus Language Selection Menu
When Clonezilla loads, select your preferred language and keyboard layout, then press Enter to continue, if you are asked.
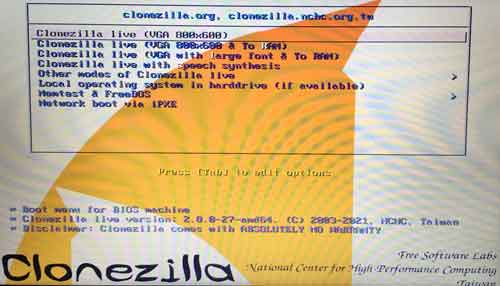
On the next screen, select "Clonezilla live (Default settings, VGA 800x600)" and press Enter.
 How To Clone A Computer
Clonezilla Greeting Screen
Next, choose the "device-device option" and select your source hard drive. This is the hard drive that you want to take a copy of, and in my case, it is the hard drive inside my Laptop.
Next, select your destination hard drive. This is the hard drive where the cloned data will be saved, and in my case, this is the external hard drive I plugged in earlier.
Next, choose the cloning mode that you want to use. If you want an exact copy of the hard drive, choose "device-device clone." If you wish to compress the data to save space, choose "expert mode" and select the compression level. I have plenty of space on my external hard drive, so I usually go with the device-device clone option.
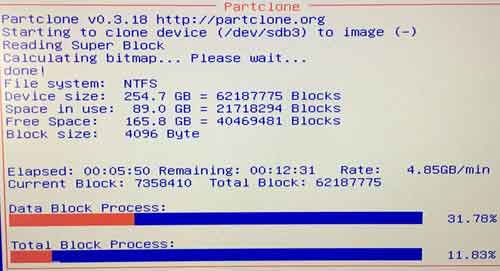
I then usually leave the rest of the Clonezilla settings and press Enter to start the cloning process. The image below shows the cloning on my Laptop in progress.
 How To Clone A Computer
Cloning In Progress
The process can take some time to complete. For a 240 GB HDD, with around 81 GB in use, and using a fairly modern SSD Hard drive to host the cloned image, the process was around 20 minutes in total.
Once the cloning process is complete, remove the Clonezilla USB drive, and external hard disk drive, and restart the computer. Again, do not forget to enter your BIOS/UEFI and change the settings back to that they were!
The image below shows the files of the image that was taken of my Laptop.
 How To Clone A Computer
Clonezilla Image Folder
How do You Maintain A Clone Of Your Computer?
Maintaining a clone of your computer is important to ensure that the backup remains up-to-date and functional. Here is what I usually do:-
- Take semiregular cloned images of my Laptop, to ensure any major changes I make are backed up, in the event the worst happens. Once a month is usually OK for me.
- Each cloned image should have a descriptive label that you understand. Including the date the backup was taken is really useful.
- Annually I will test the backup be restoring to my Laptop. This provides assurances that the cloned images I take will actually work if they are called upon in an emergency.
- I also check the Rufus and Clonezilla sites and download the latest versions of their software. This is best practice and ensures there are no issues with compatibility in an emergency.
- My cloned backups are stored on my external hard drive, but I also secure and upload to a secure cloud location, in case the external hard droves encounters an issue, and the cloned images are no longer accessible.
Follow these steps and you won't go far wrong.
How To Clone A Computer | Final Thoughts
I hope you can see that cloning your computer is a relatively straightforward task. Once you have worked through the steps a couple of times, it becomes second nature.
Cloning is an excellent time saver, and is something I encourage all home computer users to learn. You will not regret it.